

How To Use 3d Objects For 2d Animation
Pupil animation achieves a 2D look using 3D software
Supinfocom students are no strangers to Artistic Bloq and 3D World – in the past we've featured some impressive shorts from this top French school – and here we are showcasing another outstanding short, Bet She'an. We caught up with art director Julien Soler, manager Bastien Letoile and technical manager David Calvet to find out more than nearly the piece of work that went into this highly stylised piece.
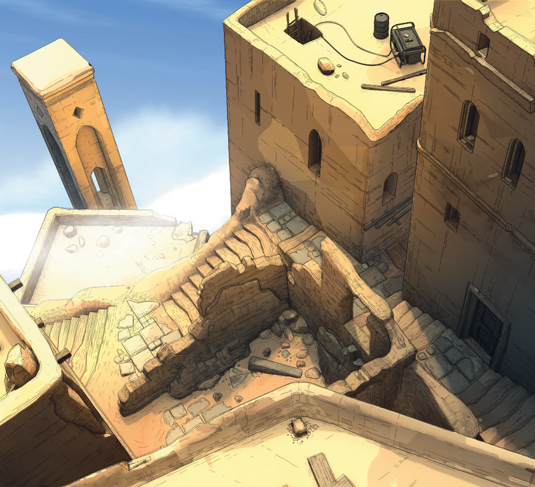
"In the citadel of Bet She'an, lost in the loftier clouds of the sky, humans are progressively morphing into crows," says Calvet. "In this metaphor for death, nosotros follow a man who decides to leave a trace of his dwindling race. He's sculpting a gigantic human in the rock before he himself turns into a bird."
Art director Soler adds, "The visual references for Bet She'an came from the Middle East, the fertile crescent where the first humans built cities and early civilisations: from Hashemite kingdom of jordan, Republic of yemen and Uzbekistan for their dryness and their architecture, the ruins of Petra, and Morocco for the ksar Aït-Ben-Haddou."
Creating a visual style
From the offset of the project, the team knew they wanted to stay shut to the style of graphic novels. "Our main references were Hugo Pratt, Sergio Toppi and Moebius: three of the greatest modern graphic novelists. Their line is mastered with dandy precision and sensitivity," says Calvet.
Bet She'an art director Soler was responsible for choosing every aspect of the visuals, from the amphoras and the architecture – which gives the city its distinct look – to choosing colours, lights, and working on shot limerick.
"I was as well the designer for all the characters," he says. "It was interesting to create the mix of human and crow anatomy; we drew lots of characters, mainly silhouettes, to detect which morph would have the credibility nosotros needed."
Soler worked closely with the grapheme modeller to go on the lines and the dynamic of each of the characters. The most difficult job was to draw over each shot to give them their ain graphic mode and also the character's UVs.
"We started on a graphics tablet but cross-hatching on that was a hurting, there was a lag when making fast strokes," explains Soler. "So nosotros moved to a lightbox and Rotring pen to get this particular handmade style. It was perfect only, with more than 80 shots to hatch, the work was very arduous – I spent days and days angle over my desk-bound to finish this on fourth dimension."
For the production, the team developed a notable manner to achieve pilus and feathers. "The rendering node for Hair Farm proved problematic, and we were forced to bake the modelling and the animation of all Pilus Farm simulated hair and feather systems," says Calter. "This way we could render our scenes on any computer without using the Hair Subcontract plug-in. It was tedious merely effective."
Heavy load
The rendering pipeline for the film was very heavy, according to Calter. "We started with the idea of a 2D illustration, and the watercolour manner we chose presented a challenge. In that location is no clear fashion to achieve this effect hands in 3D.
"Our 2D artists were already busy, our art director was working on hatching the shots and the characters, and our matte painter was working on skies and 2D effects such equally smoke and wind, so we decided to find a procedural fashion to achieve those 2d watercolour effects from our 3D models. We started research on two sides: one branch was to get an expressive, non-realistic render in 3D, and the other was to get 2nd texture furnishings and 2D aspects through 2d filters.
"The final rendering pipeline was made of 12 passes, two of which were very important – i was to requite an expressive render and the 2nd was calculated from the first one to get a 2nd texture effect."

After that, the squad did a series of passes in V-Ray, including Lighting, Global Illumination, Shadow, Occlusion, Specular, Falloff and Toon. They also did passes for the cantankerous-hatching, ID and masking.
The first pass nosotros created in V-Ray was very interesting," says Calvet, "because its way of calculating lights is close to the fashion humans see. It was like shooting fish in a barrel to detect the eye bespeak between flat-coloured objects and a photorealistic render. The second laissez passer was very uncomplicated: taking our last expressive return, we transferred the greyscale of the picture show into a coloured multi-noise gradient. All of this was washed in Screen Texture manner in an empty Max scene. By doing this equally much as needed, we created a new texture every time.
The about important thing when creating a 2D/3D movie is not to try to achieve the whole matter at once
"Finally the most important thing when creating a 2nd/3D flick is not to try to notice a way to attain the whole thing at once, nor to think that each shot has to be done equally one slice. A hybrid workflow volition give yous the choice between different ways to get the same result, photographic camera mapping, procedural textures, After Effects 3D layers and and then on. In some instances nosotros were creating textures, lighting and models for the whole film but sometimes it was just for one single shot."
When it came fourth dimension to render, the team had to come up with a artistic workaround. "To return nosotros used V-Ray in a way we normally don't," says David. "Nosotros used a V-Ray proxy to get an expressive render style – this was our color basis. From this showtime render nosotros needed some textures, so we plugged that back in 3ds Max and made a noisy gradient, which was applied in Screen mode on our first expressive pass. Nosotros as well used Damian Nenow'southward cloud cosmos technique."
A collective cosmos
For a student team to create such a polished, sophisticated picture in such a brusque space of time is very impressive. With such a heavy workload and complicated pipeline, was there anything they would have done differently in hindsight? "The rendering and hair and feather challenges meant we had to rush some bits of the blitheness, which was a shame, but deadlines were at our heels," says Calvet. "We all learned a lot during this project, mostly about production pipelines and mail service-product bugs.
"We had arguments about lighting, colours and ambient on some shots, everything wasn't fully locked down – to a caste, information technology's of import to keep some aspects undecided earlier production starts. It wasn't a big problem, and finally it helped us all to see the same moving picture."
This article originally appeared in 3D World result 178.
Liked this? Read these!
- The all-time 3D movies coming in 2014
- Discover what'southward adjacent for Augmented Reality
- Download costless textures: high resolution and ready to employ now

Thank you for reading v articles this calendar month* Join now for unlimited access
Enjoy your first month for just £i / $1 / €one
*Read 5 free articles per month without a subscription
Join now for unlimited admission
Try first month for just £1 / $ane / €1
Related articles
Source: https://www.creativebloq.com/animation/2d-look-with-3d-tools-21410748
Posted by: carterwasat1981.blogspot.com
0 Response to "How To Use 3d Objects For 2d Animation"
Post a Comment